


I Learned How To Make A Rails Template This Week
I’ve always wanted to learn how to make a Rails Template. Every week in my 20in20 challenge so far I’ve learned how to do something new in Ruby on Rails. This week was no different, because I learned how templates work in Rails 6! I started with week knowing absolutely nothing about templates. And in all honesty, I wasn’t sure I would be able to figure it out before the week was over.
I persisted, however, and the result is almost too good to be true. The feeling I had the first time my “rails new” command ran, and there were no errors, was absolutely magical. The complete command that you’ll be running, by the way, will be “rails new project_name -m template_name”. Now of course, running one command to do all of the Devise and Bootstrap setup will come at a cost.
I’ve covered how to add Devise to Rails applications before, over on my YouTube channel. You can find me on YouTube by searching Deanin along with Devise, or just click my name there. I’ve also covered adding Bootstrap 4 to Rails 6 on this blog before. So I’m definitely familiar with how much time could be saved by skipping these steps.
Hopefully giving you both the command up front, as well as links to my other tutorials, let’s you know I’m not click baiting you. The only caveat you’ll have to deal with is that we need to actually create the Rails template. That’s where this tutorial comes in.
Video Version of Tutorial
This project is part 8 of my YouTube channel’s 20in20 challenge. Every week I create a new Ruby on Rails project. Previous weeks have covered:
- Creating A Blog With Action Text Comments
- A Freelance Restaurant In Production
- Making A First Time Portfolio Project
- Using Ruby on Rails as an API for a JavaScript User
- Using Ruby on Rails And React To Create a Todo List
- Game Review Website With Sorting By Rating
- Tic Tac Toe Game In P5JS With A Working Leaderboard
The Project Overview
Now the beauty of this Rails template project is that we can both try it out at the same time. Because the 20in20 challenge has a GitHub repository we can use it to run this template. Go ahead and navigate to your Linux terminal and run the following commands.
        rails new blog_demo -m https://raw.githubusercontent.com/Deanout/20in20/master/week8/template.rb
        cd blog_demo
        rails s
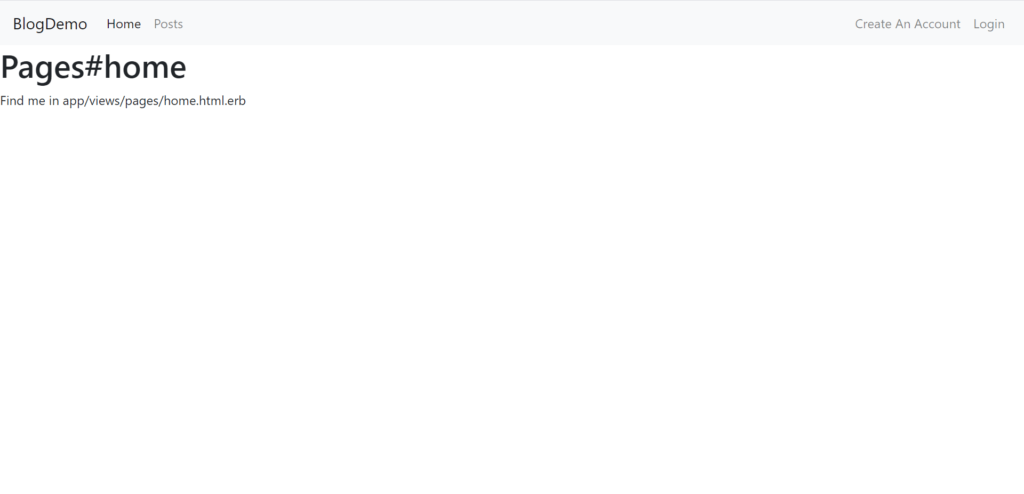
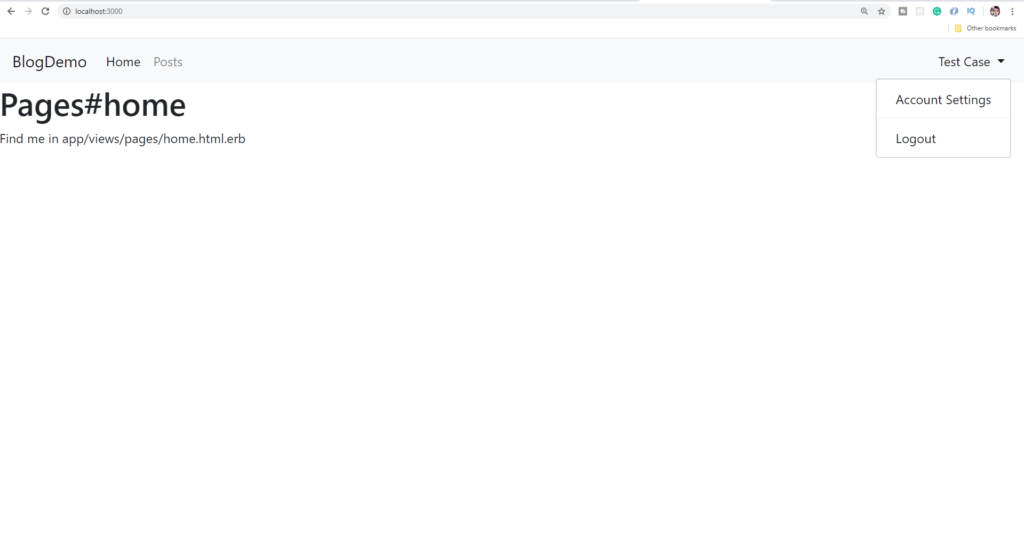
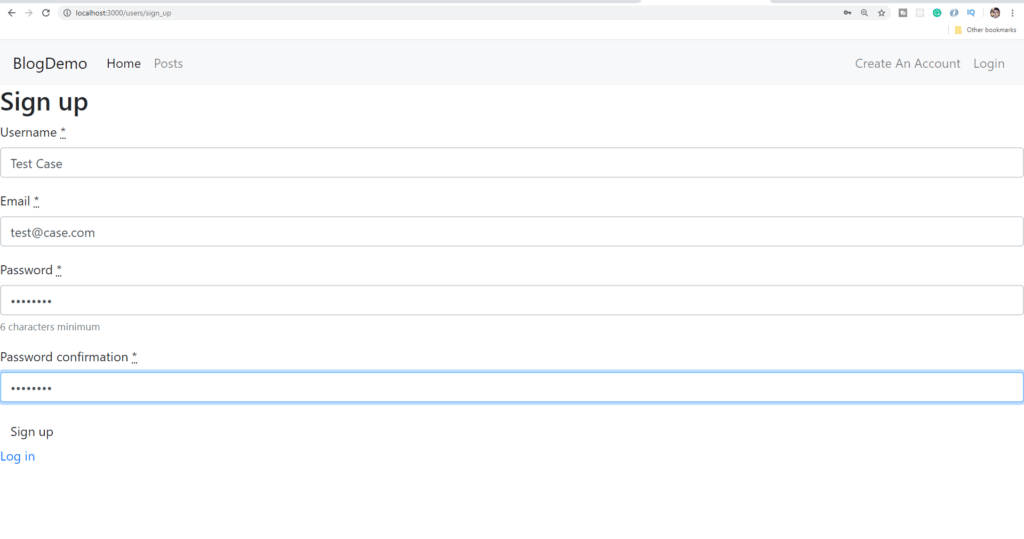
Now navigate to localhost:3000, and you should see something like the following images. You’ll have a posts scaffold created, along with Devise user accounts with working usernames. You’ll also things are styled with Bootstrap, and that you have a bootstrap navbar. And we did it all with one command. But before you click away in excitement, what happens if you want to extend this? Thankfully, it’s not that hard, but I’m going to ask you to do a little work first. I think it would help if you also went through the process of building this Rails template. At least once, so that you understand how they work.
After you’re done looking at the app, we can get started on building the template down below.

Setting Up The Template And Adding Simple Form
We’re going to begin by adding our gems, setting up simple form, and the skeleton of the Rails template. Let’s start by requiring fileutils and then adding those functions. We’re also going to define a function called source_paths, which is just the path we’re going to need later. Go ahead and make a file called “template.rb”. All of our code in this tutorial will go in there.
# template.rb
# frozen_string_literal: true

# Writing and Reading to files
require 'fileutils'

def add_gems
  gem 'devise'
  gem 'simple_form'
end

def setup_simple_form
  generate 'simple_form:install --bootstrap'
end

def source_paths
  [__dir__]
end
As you can see, a lot of this code is going to look similar to how it does in Rails. If we need to declare a gem, we just type gem ‘name’. If we need to run a rails generate, we just omit “rails” and put the part after generate in quotations. But it’s largely the same as what we’re used to. Let’s go ahead and call source_paths, add_gems, and then figure out what to do after the bundle command runs. For now we’ll just leave some empty function names that we can define later.
source_paths

add_gems

# What we want to do after bundling.
# Note: Aside from simple_form, the rest of these functions don't exist yet.
after_bundle do
  setup_simple_form
  setup_users

  demo_rails_commands

  add_bootstrap
  add_bootstrap_navbar
end
As you can see, we’re hoping to handle the user accounts next. That’s probably for the best, because they’re by far the most involved step. We need to modify a lot of files in this next part, let’s go ahead and get started.
Creating Devise Users, Admins, And Adding Usernames
The next step is going to involve setting up the users, adding an admin boolean, and giving them usernames. The usernames alone would normally take you probably 10-15 minutes. So doing it once here could potentially save you hours down the line!
For this part we’re going to be using a few methods that I’ll briefly describe here:
inject_into_file takes in a file name as one argument, and a flag (Position in the file) as the second. The file names are obvious, but the flag might not make a lot of sense. Essentially we’re passing in either before: something, or after: something. Usually that something is before: “end”, which means before the closing end tag of the file.
Let’s just start off easy and do the usual devise commands
def setup_users
  generate 'devise:install'
  environment "config.action_mailer.default_url_options = { host: 'localhost', port: 3000 }",
              env: 'development'
  generate :devise, 'User', 'username:string:uniq', 'admin:boolean'
  rails_command 'db:migrate'
  generate 'devise:views'

end
As you can see, these all look roughly the same as they normally do. Let’s say, however, that we’d like to set the admin boolean to have a default value of false. For that we’d need to add this in_root block, in order to correctly modify the database migration.
def setup_users
  generate 'devise:install'
  environment "config.action_mailer.default_url_options = { host: 'localhost', port: 3000 }",
              env: 'development'
  generate :devise, 'User', 'username:string:uniq', 'admin:boolean'
  rails_command 'db:migrate'
  generate 'devise:views'

  in_root do
    migration = Dir.glob('db/migrate/*').max_by { |f| File.mtime(f) }
    gsub_file migration, /:admin/, ':admin, default: false'
  end
end
Next, let’s go ahead and set up the application_controller.rb file according to this official Devise guide on usernames. By doing this, we’re beginning to create usernames that we can log in with. I’ve covered how to do this exact process in the following video, so I’ll spare you the lengthy explainations.
def setup_users
  generate 'devise:install'
  environment "config.action_mailer.default_url_options = { host: 'localhost', port: 3000 }",
              env: 'development'
  generate :devise, 'User', 'username:string:uniq', 'admin:boolean'
  rails_command 'db:migrate'
  generate 'devise:views'

  in_root do
    migration = Dir.glob('db/migrate/*').max_by { |f| File.mtime(f) }
    gsub_file migration, /:admin/, ':admin, default: false'
  end
  inject_into_file 'app/controllers/application_controller.rb', before: 'end' do
    "\n  before_action :configure_permitted_parameters, if: :devise_controller?
    protected
    def configure_permitted_parameters
      added_attrs = %i[username email password password_confirmation remember_me]
      devise_parameter_sanitizer.permit :sign_up, keys: added_attrs
      devise_parameter_sanitizer.permit :account_update, keys: added_attrs
    end\n"
  end
end
As you can see, we’re using inject_into_file here in order to add the required sanitizer before the closing end tag of the controller. This will allow the controller to actually permit the username key. We still have to perform the necessary validations though, so let’s add those to our user.rb file.
def setup_users
  generate 'devise:install'
  environment "config.action_mailer.default_url_options = { host: 'localhost', port: 3000 }",
              env: 'development'
  generate :devise, 'User', 'username:string:uniq', 'admin:boolean'
  rails_command 'db:migrate'
  generate 'devise:views'

  in_root do
    migration = Dir.glob('db/migrate/*').max_by { |f| File.mtime(f) }
    gsub_file migration, /:admin/, ':admin, default: false'
  end
  inject_into_file 'app/controllers/application_controller.rb', before: 'end' do
    "\n  before_action :configure_permitted_parameters, if: :devise_controller?
    protected
    def configure_permitted_parameters
      added_attrs = %i[username email password password_confirmation remember_me]
      devise_parameter_sanitizer.permit :sign_up, keys: added_attrs
      devise_parameter_sanitizer.permit :account_update, keys: added_attrs
    end\n"
  end

  inject_into_file 'app/models/user.rb', before: 'end' do
    "\n validates :username, presence: true, uniqueness: { case_sensitive: false }
        validate :validate_username
        attr_writer :login
        def login
            @login || username || email
        end
        def validate_username
            errors.add(:username, :invalid) if User.where(email: username).exists?
        end
        def self.find_for_database_authentication(warden_conditions)
            conditions = warden_conditions.dup
            if login = conditions.delete(:login)
                where(conditions.to_hash).where(['lower(username) = :value OR lower(email) = :value', {value: login.downcase}]).first
            elsif conditions.key?(:username) || conditions.key?(:email)
                where(conditions.to_h).first
            end
        end\n"
    end
end
This is what your setup_users function should look like now. We’re almost done with this section, I promise. For this next part we’re going to use inject_into_file, but it’s going to be with the after flag. The reason is we want to insert the auth keys after the comment. Just to show you how it’s done, not because it wouldn’t work otherwise.
We’re then going to need to do a find and replace inside of our devise login page (sessions/new.html.erb). Now unfortunately, I don’t know if that method exists, so we’ll have to make our own function for this one. Afterwards we’re going to do two last inject_into_files, and we’ll be done with the Devise setup! I’ll explain the find and replace after the code block, see you after the jump.
def setup_users
  generate 'devise:install'
  environment "config.action_mailer.default_url_options = { host: 'localhost', port: 3000 }",
              env: 'development'
  generate :devise, 'User', 'username:string:uniq', 'admin:boolean'
  rails_command 'db:migrate'
  generate 'devise:views'

  in_root do
    migration = Dir.glob('db/migrate/*').max_by { |f| File.mtime(f) }
    gsub_file migration, /:admin/, ':admin, default: false'
  end
  inject_into_file 'app/controllers/application_controller.rb', before: 'end' do
    "\n  before_action :configure_permitted_parameters, if: :devise_controller?
    protected
    def configure_permitted_parameters
      added_attrs = %i[username email password password_confirmation remember_me]
      devise_parameter_sanitizer.permit :sign_up, keys: added_attrs
      devise_parameter_sanitizer.permit :account_update, keys: added_attrs
    end\n"
  end

  inject_into_file 'app/models/user.rb', before: 'end' do
    "\n validates :username, presence: true, uniqueness: { case_sensitive: false }
        validate :validate_username
        attr_writer :login
        def login
            @login || username || email
        end
        def validate_username
            errors.add(:username, :invalid) if User.where(email: username).exists?
        end
        def self.find_for_database_authentication(warden_conditions)
            conditions = warden_conditions.dup
            if login = conditions.delete(:login)
                where(conditions.to_hash).where(['lower(username) = :value OR lower(email) = :value', {value: login.downcase}]).first
            elsif conditions.key?(:username) || conditions.key?(:email)
                where(conditions.to_h).first
            end
        end\n"
  end

  inject_into_file 'config/initializers/devise.rb', after: '# config.authentication_keys = [:email]' do
    "\n config.authentication_keys = [:login]\n"
  end

  find_and_replace_in_file('app/views/devise/sessions/new.html.erb', 'email', 'login')

  inject_into_file 'app/views/devise/registrations/new.html.erb', before: '<%= f.input :email' do
    "\n<%= f.input :username %>\n"
  end

  inject_into_file 'app/views/devise/registrations/edit.html.erb', before: '<%= f.input :email' do
    "\n<%= f.input :username %>\n"
  end
end

def find_and_replace_in_file(file_name, old_content, new_content)
  text = File.read(file_name)
  new_contents = text.gsub(old_content, new_content)
  File.open(file_name, 'w') { |file| file.write new_contents }
end
The inject statements should be fairly routine for you by now, but what’s up with that find_and_replace function? Basically, it:
- Takes in the file name, content to replace, and the content to replace it with.
- Stores the replaced text in the new_contents variable.
- Opens the file and says write this new copy to the file, replacing the old content with the new content.
This allows us to effectively find and replace one string with another. I wasn’t aware of any baked-in functionality to do this, so I decided it was easier to just roll my own. Since it’s only 3 lines of code, this way seemed faster than Googling for an hour.
The next step is going to be creating the scaffold so that we can demo some rails commands!
Demoing Rails Commands In The Template
Compared to the Devise portion, this section should be a breeze. We’re already calling the “demo_rails_commands” function inside of our after_bundle block, so let’s go ahead and create it now.
def demo_rails_commands
  generate(:controller, 'pages home')
  route "root to: 'pages#home'"
  rails_command 'g scaffold post title:string body:text --no-scaffold-stylesheet'
  rails_command 'db:migrate'
end
And that’s it! We create a pages controller with a home action and set it to be the root. We generate a scaffold without that pesky scaffolds.scss file, and then we migrate the database. Boom, time for Bootstrap!
Adding Bootstrap To Our Template
Okay, this is the part where we finally make use of the FileUtils we required earlier! Now I have covered adding Bootstrap 4 to Rails 6 before on this blog, you can find that tutorial here. I’ve also created a YouTube tutorial covering this topic, so feel free to watch that to get up to speed as well. The first step is to run “yarn add bootstrap jquery popper.js” so let’s start there.
def add_bootstrap
  run 'yarn add bootstrap jquery popper.js'
end
Next we need to inject our aliases into the webpack environment.js file. Then we’ll inject the import statements into our app/javascript/packs/application.js file. Thankfully we’re very familiar with that function by now!
def add_bootstrap
  run 'yarn add bootstrap jquery popper.js'
  inject_into_file 'config/webpack/environment.js', before: 'module.exports = environment' do
    "const webpack = require('webpack')
        environment.plugins.append('Provide',
            new webpack.ProvidePlugin({
                $: 'jquery',
                jQuery: 'jquery',
                Popper: ['popper.js', 'default']
            })
        )\n"
  end
  inject_into_file 'app/javascript/packs/application.js', after: '// const imagePath = (name) => images(name, true)' do
    "\nimport 'bootstrap';
        import './stylesheets/application.scss';\n"
  end
end
The final step is going to be using FileUtils to make the stylesheets directory, and then again to create the application.scss file. We’ll then use append_to_file, rather than inject, to add our scss import statement. Your add_bootstrap function should now look like this. If it does, then it’s time to finish things off by adding the bootstrap navbar!
def add_bootstrap
  run 'yarn add bootstrap jquery popper.js'
  inject_into_file 'config/webpack/environment.js', before: 'module.exports = environment' do
    "const webpack = require('webpack')
        environment.plugins.append('Provide',
            new webpack.ProvidePlugin({
                $: 'jquery',
                jQuery: 'jquery',
                Popper: ['popper.js', 'default']
            })
        )\n"
  end
  inject_into_file 'app/javascript/packs/application.js', after: '// const imagePath = (name) => images(name, true)' do
    "\nimport 'bootstrap';
        import './stylesheets/application.scss';\n"
  end
  FileUtils.mkdir_p('app/javascript/packs/stylesheets')
  app_scss = 'app/javascript/packs/stylesheets/application.scss'
  FileUtils.touch(app_scss)
  append_to_file app_scss do
    "\n@import '~bootstrap/scss/bootstrap';\n"
  end
end
Putting It All Together - The Bootstrap Navbar
The wonderful thing about this bootstrap navbar section is that it uses a lot of things that we’ve covered already. We use FileUtils, inject_into_file, append_to_file, and Devise methods! I’m not going to explain this one too much, and instead let you try to figure it out. If there’s something that doesn’t make sense, feel free to ask me in the comments down below!
We need to create our partial file, so we use FileUtil’s touch. Then we need to inject the render call above our yield tag, so we use inject. Afterwards we’ll append the navbar to the empty _navbar.html.erb file.
Following that we modify the navbar from getbootstrap to work with our Rails links. The ul gets a ml-auto to force the username dropdown to the right of the navbar. We also add a dropdown-menu-right class to it to make the dropdown work properly.
Finally we do some current_user checks to display the dropdown if the user is logged in. If they aren’t, we prompt them to create an account or sign in.
Once all of this is put together, our add_bootstrap_navbar function looks like this.
def add_bootstrap_navbar
  navbar = 'app/views/layouts/_navbar.html.erb'
  FileUtils.touch(navbar)
  inject_into_file 'app/views/layouts/application.html.erb', before: '<%= yield %>' do
    "\n<%= render 'layouts/navbar' %>\n"
  end

  append_to_file navbar do
    '<nav class="navbar navbar-expand-lg navbar-light bg-light">
        <%= link_to Rails.application.class.parent_name, root_path, class:"navbar-brand" %>
        <button class="navbar-toggler" type="button" data-toggle="collapse" data-target="#navbarSupportedContent" aria-controls="navbarSupportedContent" aria-expanded="false" aria-label="Toggle navigation">
          <span class="navbar-toggler-icon"></span>
        </button>
        <div class="collapse navbar-collapse" id="navbarSupportedContent">
          <ul class="navbar-nav mr-auto">
            <li class="nav-item active">
              <%= link_to "Home", root_path, class:"nav-link" %>
            </li>
            <li class="nav-item">
              <%= link_to "Posts", posts_path, class:"nav-link" %>
            </li>
          </ul>
          <ul class="navbar-nav ml-auto">
            <% if current_user %>
            <li class="nav-item dropdown">
                <a class="nav-link dropdown-toggle" href="#" id="navbarDropdown" role="button" data-toggle="dropdown" aria-haspopup="true" aria-expanded="false">
                    <%= current_user.username %>
                </a>
                <div class="dropdown-menu dropdown-menu-right" aria-labelledby="navbarDropdown">
                    <%= link_to "Account Settings", edit_user_registration_path, class:"dropdown-item" %>
                    <%= link_to "New Post", new_post_path, class:"dropdown-item" %>
                    <div class="dropdown-divider"></div>
                    <%= link_to "Logout", destroy_user_session_path, method: :delete, class:"dropdown-item" %>
                </div>
            </li>
            <% else %>
            <li class="nav-item">
                <%= link_to "Create Account", new_user_registration_path, class:"nav-link" %>
            </li>
            <li class="nav-item">
              <%= link_to "Login", new_user_session_path, class:"nav-link" %>
            </li>
            <% end %>
          </ul>
        </div>
      </nav>'
  end
end
Testing Our Template and Making It User Friendly
This is it, the final stretch! Let’s go ahead and test the command. Assuming you named your template “template.rb”, go ahead and run this command and then go grab some tea.
rails new template_app -m template.rb
If everything worked correctly, it should have created the same app we did at the start of this tutorial, all in one command! Now, if you upload this Rails template to, say, GitHub, you might want a shorter URL. Go ahead and grab the URL for the raw template, so in my case it’s https://raw.githubusercontent.com/Deanout/20in20/master/week8/devise_bootstrap_template.rb
Head on over to a URL shortener like bit.ly, and create a new short URL. I’m going to set mine to be bit.ly/deanin_template. Your edit menu should look something like my image below.
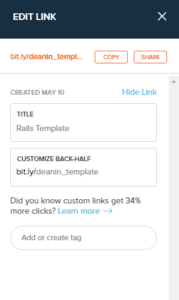
Now you can run the following command instead of using that long URL. It’s easy to remember and super convenient to use! Exactly what I set out to create.
rails new app_name -m https://bit.ly/deanin_template
Closing Thoughts
Overall I’m very happy with how this project turned out. Considering I started this week knowing nothing about templates, I’m extremely proud. Hopefully this tutorial also helped out some of you as well!
This tutorial left out some details that the video covered, but it also covered shortening the link which the video didn’t. So if you’re still a bit confused, chances are the video covered it better. Maybe go check that out if you want some more template goodness!
If you decide to expand this Rails template idea and do things like use user input to create more expansive templates, let me know. I’m always excited to hear what people manage to do with my tutorials!
Until next time friends! Stay safe and healthy.
Final Code
    # frozen_string_literal: true

# Writing and Reading to files
require 'fileutils'

def add_gems
  gem 'devise'
  gem 'simple_form'
end

def setup_simple_form
  generate 'simple_form:install --bootstrap'
end

def source_paths
  [__dir__]
end

def setup_users
  generate 'devise:install'
  environment "config.action_mailer.default_url_options = { host: 'localhost', port: 3000 }",
              env: 'development'
  generate :devise, 'User', 'username:string:uniq', 'admin:boolean'
  rails_command 'db:migrate'
  generate 'devise:views'

  in_root do
    migration = Dir.glob('db/migrate/*').max_by { |f| File.mtime(f) }
    gsub_file migration, /:admin/, ':admin, default: false'
  end
  inject_into_file 'app/controllers/application_controller.rb', before: 'end' do
    "\n  before_action :configure_permitted_parameters, if: :devise_controller?

    protected
    def configure_permitted_parameters
      added_attrs = %i[username email password password_confirmation remember_me]
      devise_parameter_sanitizer.permit :sign_up, keys: added_attrs
      devise_parameter_sanitizer.permit :account_update, keys: added_attrs
    end\n"
  end

  inject_into_file 'app/models/user.rb', before: 'end' do
    "\n validates :username, presence: true, uniqueness: { case_sensitive: false }
        validate :validate_username
        attr_writer :login

        def login
            @login || username || email
        end

        def validate_username
            errors.add(:username, :invalid) if User.where(email: username).exists?
        end

        def self.find_for_database_authentication(warden_conditions)
            conditions = warden_conditions.dup
            if login = conditions.delete(:login)
                where(conditions.to_hash).where(['lower(username) = :value OR lower(email) = :value', {value: login.downcase}]).first
            elsif conditions.key?(:username) || conditions.key?(:email)
                where(conditions.to_h).first
            end
        end\n"
  end

  inject_into_file 'config/initializers/devise.rb', after: '# config.authentication_keys = [:email]' do
    "\n config.authentication_keys = [:login]\n"
  end

  find_and_replace_in_file('app/views/devise/sessions/new.html.erb', 'email', 'login')

  inject_into_file 'app/views/devise/registrations/new.html.erb', before: '<%= f.input :email' do
    "\n<%= f.input :username %>\n"
  end

  inject_into_file 'app/views/devise/registrations/edit.html.erb', before: '<%= f.input :email' do
    "\n<%= f.input :username %>\n"
  end
end

def find_and_replace_in_file(file_name, old_content, new_content)
  text = File.read(file_name)
  new_contents = text.gsub(old_content, new_content)
  File.open(file_name, 'w') { |file| file.write new_contents }
end

def demo_rails_commands
  generate(:controller, 'pages home')
  route "root to: 'pages#home'"
  rails_command 'g scaffold post title:string body:text --no-scaffold-stylesheet'
  rails_command 'db:migrate'
end

def add_bootstrap
  run 'yarn add bootstrap jquery popper.js'
  inject_into_file 'config/webpack/environment.js', before: 'module.exports = environment' do
    "const webpack = require('webpack')
        environment.plugins.append('Provide',
            new webpack.ProvidePlugin({
                $: 'jquery',
                jQuery: 'jquery',
                Popper: ['popper.js', 'default']
            })
        )\n"
  end
  inject_into_file 'app/javascript/packs/application.js', after: '// const imagePath = (name) => images(name, true)' do
    "\nimport 'bootstrap';
        import './stylesheets/application.scss';\n"
  end
  FileUtils.mkdir_p('app/javascript/packs/stylesheets')
  app_scss = 'app/javascript/packs/stylesheets/application.scss'
  FileUtils.touch(app_scss)
  append_to_file app_scss do
    "\n@import '~bootstrap/scss/bootstrap';\n"
  end
end

def add_bootstrap_navbar
  navbar = 'app/views/layouts/_navbar.html.erb'
  FileUtils.touch(navbar)
  inject_into_file 'app/views/layouts/application.html.erb', before: '<%= yield %>' do
    "\n<%= render 'layouts/navbar' %>\n"
  end

  append_to_file navbar do
    '<nav class="navbar navbar-expand-lg navbar-light bg-light">
        <%= link_to Rails.application.class.parent_name, root_path, class:"navbar-brand" %>
        <button class="navbar-toggler" type="button" data-toggle="collapse" data-target="#navbarSupportedContent" aria-controls="navbarSupportedContent" aria-expanded="false" aria-label="Toggle navigation">
          <span class="navbar-toggler-icon"></span>
        </button>

        <div class="collapse navbar-collapse" id="navbarSupportedContent">
          <ul class="navbar-nav mr-auto">
            <li class="nav-item active">
              <%= link_to "Home", root_path, class:"nav-link" %>
            </li>
            <li class="nav-item">
              <%= link_to "Posts", posts_path, class:"nav-link" %>
            </li>
          </ul>
          <ul class="navbar-nav ml-auto">
            <% if current_user %>
            <li class="nav-item dropdown">
                <a class="nav-link dropdown-toggle" href="#" id="navbarDropdown" role="button" data-toggle="dropdown" aria-haspopup="true" aria-expanded="false">
                    <%= current_user.username %>
                </a>
                <div class="dropdown-menu dropdown-menu-right" aria-labelledby="navbarDropdown">
                    <%= link_to "Account Settings", edit_user_registration_path, class:"dropdown-item" %>
                    <%= link_to "New Post", new_post_path, class:"dropdown-item" %>
                    <div class="dropdown-divider"></div>
                    <%= link_to "Logout", destroy_user_session_path, method: :delete, class:"dropdown-item" %>
                </div>
            </li>
            <% else %>
            <li class="nav-item">
                <%= link_to "Create Account", new_user_registration_path, class:"nav-link" %>
            </li>
            <li class="nav-item">
              <%= link_to "Login", new_user_session_path, class:"nav-link" %>
            </li>
            <% end %>
          </ul>
        </div>
      </nav>'
  end
end

source_paths

add_gems

after_bundle do
  setup_simple_form
  setup_users

  demo_rails_commands

  add_bootstrap
  add_bootstrap_navbar
end
Related Posts

Fast Code Snippets And Syntax Highlighting In Rails 6 With Highlight.js | Week 13 – 20in20

Iterate Fast – How You Can Have Fewer Bugs By Using Rspec TDD In Ruby On Rails 6 | 20in20 – Week 14

7 replies on “Add Devise And Bootstrap To Your Rails Project With One Click Using A Rails Template”
Wow this one was a long one to write. Learned a lot while writing it though, so I’m gonna count it a win!
that was what i was looking for, appreciate the work! helpes a lot!
Glad it helped! I appreciate the feedback!
[…] positives? Well for starters while Ruby on Rails has templates, a topic I’ve covered before here, WordPress has Themes. Generally, when you think of themes, you might think of an HTML5 and CSS3 […]
This is something New !
What are the pros and cons of housing a blog on corporate website vs. using Blogspot?
thank you, cool tutorial, how can i do the with docker/docker composer, please