


Code Snippets In Rails 6 Done Easy
One of the things I always find myself doing is looking up familiar code snippets because I’ve forgotten them. For the 13th 20in20 challenge, I decided to create a tool to help store code snippets. Now, the purpose of this tutorial isn’t to create a functional code snippet database. Rather, this tutorial is meant to tie together several different ideas.
First, there’s the idea of categorizing your code snippets by languages. By creating individual languages, you can search through your C# code snippets to find that example of a unit test. But this can be taken further; giving a code snippet a language lets you set the syntax highlighting mode for that language. By using Highlight.js, and providing it the language type, you can ensure that your code is highlighted in a friendly to read way.
Then, by tagging code snippets, you’ll also be able to search and sort by the tags you provided your snippet. Tagging is similar to how languages work, but each snippet will be able to have more than one tag. This means we’ll also be using the idea of a JOIN table to combine our tags and our snippets into taggables.
And finally, we’ll use some Rails Templates from Rails Bytes to very quickly add in Bootstrap. This is going to be similar to a previous 20in20 challenge project, where we created a Rails template for devise and bootstrap. Instead, however, we’ll just use a prebuilt template from Rails Bytes.
Video Version Of This Tutorial Coming Soon
This is normally where the video, summary, and timestamps exist. The article is in early access mode though, so standby for the video!
Timestamps
0:00 – Intro and Project Overview
2:37 – Part 1 – Project Summary and Backend Models
25:00 – Part 2 – The Middleware Controllers
36:00 – Part 3 – The Frontend Views
59:45 – Part 4 – The Turbolinks Issue, Solved!
1:02:56 – Outro and Project Summary
Project Overview
While this isn’t going to be the prettiest example project that you’ll ever work on, hopefully, you’ll still learn something. My goal for week 13’s project is to teach you how to add database-powered syntax highlighting to future projects. Along the way, I’d like to also get you comfortable with relationships. This comfort will allow you to break down very complex functionality into simple to digest features.
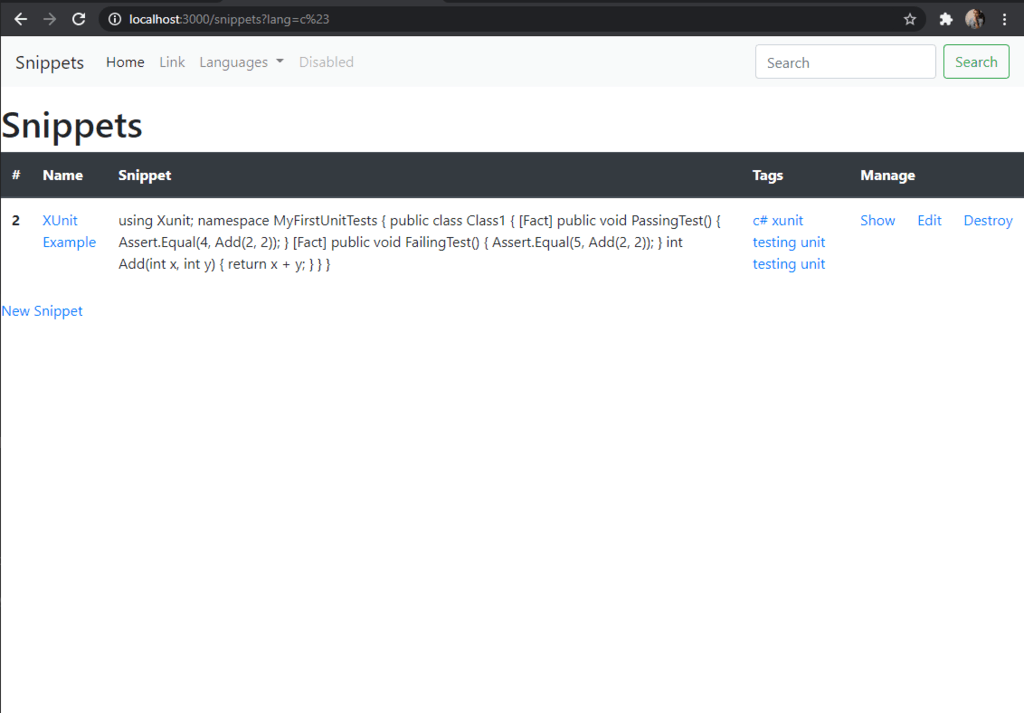
The images below should provide a brief overview of how the application will look. Don’t worry, though! We’ll go over every part, bit by bit, in the sections below. We’ll start by creating the snippets and adding the syntax highlighting. Then, we’ll move on to giving each snippet a language.
After we’re done with the languages, we’ll move onto tags. This will require us to create a join table, which is used when you have a many-to-many relationship. Because a tag has many snippets that it categorizes, and a snippet has many tags, this is a many-to-many relationship.
Part 1 - The Backend Models
The first thing we’re going to do is create all of the database migrations that we’ll need. This will include the snippets, the tags, the languages, and the join table. Because we’re starting with the backend, we’re going to start by constructing our database!
But we’re also going to be indexing our tag and language names. This is functionality that I don’t see very often in Rails tutorials. It’ll improve our quality of life down the road though. Let’s start by running the following commands from inside of our brand new Ruby on Rails application. The first command is going to be a bonus to very quickly add bootstrap to our application using Rails Bytes.
        # Add Bootstrap from the Rails Bytes template.
        rails app:template LOCATION='https://railsbytes.com/script/x9Qsqx'

        # Beginning with the snippets, give each a title and a body.
        rails g scaffold snippets title body:text

        # Next the languages. Give each an indexable name.
        rails g scaffold languages name:string:index

        # Create the tags, giving each an indexable name.
        rails g scaffold tags name:string:index

        # Finally, the join table. This enables a many to many relationship between tags and snippets.
        rails g model taggables tag:references snippet:references

        # Add a reference to the languages to the snippets.
        rails g migration add_languages_to_snippets language:references

        # Finally, migrate the database.
        rails db:migrate
Next, we’re going to set the root of our application to be the Snippets index path. We can do this inside of our config/routes.rb file. We’ll then go ahead and update each of the models as needed.
The code snippet model will have a bit extra, as we’ll need a way to get all the tags, and also select by name. We’ll use the map functions. Map functions are useful for mapping each item in a collection or array to a specific piece of logic to perform on them.
We’ll also need to make sure our languages destroy their dependents. Essentially, that means when you delete a language, its children are deleted. In theory, this will stop you from having orphan snippets bloating your database, and will instead delete them when their parent language is removed. Dependent destroys are also a really fast way to delete a lot of information, so try to use them responsibly.
# Inside the routes.rb file, set the root:
Rails.application.routes.draw do
  resources :tags
  resources :languages
  resources :snippets
  root to: 'snippets#index'
  # For details on the DSL available within this file, see https:\/\/guides.rubyonrails.org\/routing.html
end
# Inside the taggable.rb file, add your belongs_to relationships
class Taggable < ApplicationRecord
  belongs_to :snippet
  belongs_to :tag
end
# Inside of your tag.rb file, set your has_many and has_many :through relationship.
class Tag < ApplicationRecord
  has_many :taggables, dependent: :destroy
  has_many :snippets, through: :taggables
end
# Inside of your language.rb file, set your has_many and dependent: :destroy
class Language < ApplicationRecord
  has_many :snippets, dependent: :destroy
end
# And finally, in your snippet.rb file, add the following logic.
# This will create tags if they don't already exist, and also allow for joining them into a displayable collection.
class Snippet < ApplicationRecord
  has_many :taggables, dependent: :destroy
  has_many :tags, through: :taggables
  belongs_to :language

  def all_tags=(names)
    self.tags = names.split(',').map do |name|
      Tag.where(name: name.strip).first_or_create!
    end
  end

  def all_tags
    tags.map(&:name).join(', ')
  end
end
Part 2 - The Middleware Controllers
Now that our backend is set up, it’s time to move onto the controllers. These will serve as the communication layer between the pages the user visits and the backend. When you visit a page or perform an action, the route is translated into a controller action, or method. These methods then call other methods or use the model classes.
We’ll start with the application controller. Really all we’re doing in here is setting our languages for every page that we’re on. We do this because we’ll be using the languages in our navbar, which displays on every page.
# Create a before action and call the set_languages method.
class ApplicationController < ActionController::Base
  before_action :set_languages
  def set_languages
    @languages = Language.all
  end
end
The Snippets Controller
Next, we’re going to work on the bulk of the controller logic. Because we scaffolded out the tags and the languages, those are already done. You can visit localhost:3000/tags or localhost:3000/languages to create, update, and destroy those already. We need to handle our snippets controller, though.
Normally some of this logic is abstracted out to helper files. This time, though, I wanted to show that the controller is really just another ruby class though. So instead we’ll make some private helper methods, and call them from the code. This will let us set our snippets, and filter them by both language name and tag name.
We’ll also need to edit the snippet_params to include the all_tags param as well as the language_id. Overall, there are two areas of the code to pay attention to. The index method, which calls set_snippets, and the private section at the bottom. The private section contains the set_snippets method, which calls filter_by_name, and it has the snippet params.
class SnippetsController < ApplicationController
  before_action :set_snippet, only: %i[show edit update destroy]

  # GET /snippets
  # GET /snippets.json
  def index
    set_snippets
  end

  # GET /snippets/1
  # GET /snippets/1.json
  def show; end

  # GET /snippets/new
  def new
    @snippet = Snippet.new
  end

  # GET /snippets/1/edit
  def edit; end

  # POST /snippets
  # POST /snippets.json
  def create
    @snippet = Snippet.new(snippet_params)

    respond_to do |format|
      if @snippet.save
        format.html { redirect_to @snippet, notice: 'Snippet was successfully created.' }
        format.json { render :show, status: :created, location: @snippet }
      else
        format.html { render :new }
        format.json { render json: @snippet.errors, status: :unprocessable_entity }
      end
    end
  end

  # PATCH/PUT /snippets/1
  # PATCH/PUT /snippets/1.json
  def update
    respond_to do |format|
      if @snippet.update(snippet_params)
        format.html { redirect_to @snippet, notice: 'Snippet was successfully updated.' }
        format.json { render :show, status: :ok, location: @snippet }
      else
        format.html { render :edit }
        format.json { render json: @snippet.errors, status: :unprocessable_entity }
      end
    end
  end

  # DELETE /snippets/1
  # DELETE /snippets/1.json
  def destroy
    @snippet.destroy
    respond_to do |format|
      format.html { redirect_to snippets_url, notice: 'Snippet was successfully destroyed.' }
      format.json { head :no_content }
    end
  end

  private

  def set_snippets
    tag_name = params[:tag]
    lang_name = params[:lang]
    filter_by_name(tag_name, lang_name)
    @snippets = @snippets.order(created_at: :asc)
  end

  def filter_by_name(tag_name, lang_name)
    if !tag_name.nil?
      tag = Tag.find_by_name(tag_name)
      @snippets = tag.nil? ? Snippet.all : tag.snippets
    elsif !lang_name.nil?
      lang = Language.find_by_name(lang_name)
      @snippets = lang.nil? ? Snippet.all : lang.snippets
    else
      @snippets = Snippet.all
    end
  end

  # Use callbacks to share common setup or constraints between actions.
  def set_snippet
    @snippet = Snippet.find(params[:id])
  end

  # Only allow a list of trusted parameters through.
  def snippet_params
    params.require(:snippet).permit(:title, :body, :all_tags, :language_id)
  end
end
Part 3 - The Front End Views
Alright, we’re almost there. The front end section has a lot to cover, but thankfully a lot of it should be familiar HTML with a dash of Ruby. We’ll start by adding a text field for our tags so we can enter them in the form. This will allow us to enter a comma-separated list of tags in a single input field. As an additional exercise, you could change these to be buttons, and even add some remote API calls to submit to the DB in real-time on the edit page.
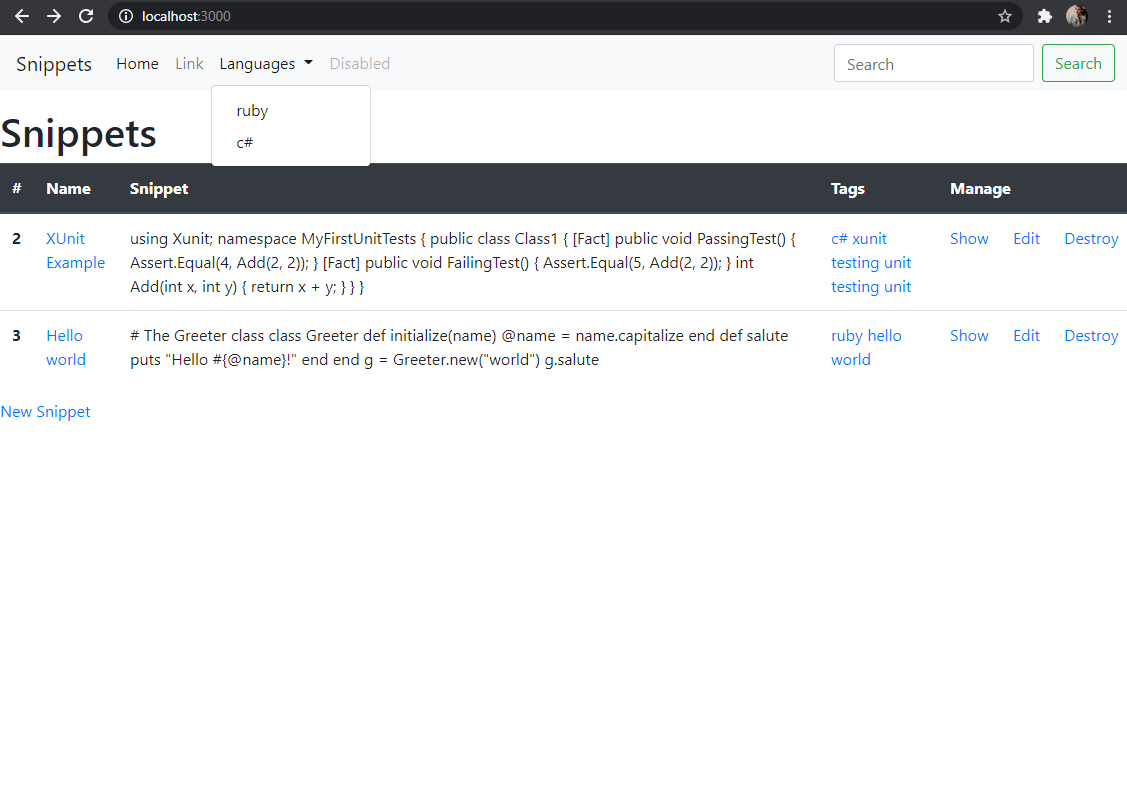
After we handle the tags, we’ll handle the languages dropdown. These are the two fields for which we’ve prepared our controllers. Hopefully, by doing things in this order you’re already familiar with how the backend part of the application works. This should allow for a more intuitive understanding of how these things are made to persist in the database.
<%= form_with(model: snippet, local: true) do |form| %>
  <% if snippet.errors.any? %>
    <div id="error_explanation">
      <h2><%= pluralize(snippet.errors.count, "error") %> prohibited this snippet from being saved:</h2>

      <ul>
        <% snippet.errors.full_messages.each do |message| %>
          <li><%= message %></li>
        <% end %>
      </ul>
    </div>
  <% end %>

  <div class="field">
    <%= form.label :title %>
    <%= form.text_field :title, class:'form-control' %>
  </div>

  <div class="field">
    <%= form.label :body %>
    <%= form.text_area :body, class:'form-control', rows:10 %>
  </div>

  <div class="large-10 large-centered-columns">
    <%= form.text_field :all_tags, placeholder: "Enter tags, separated by commas...", class:'form-control' %>
  </div>

  <div class="field">
    <%= form.label :language %>
    <%= collection_select(:snippet, :language_id, @languages, :id, :name, { class:'form-control'}) %>
  </div>

  <div class="actions">
    <%= form.submit %>
  </div>
<% end %>
The Application & Navbar
Next, we’ll edit the application.html.erb file. A couple of things need to be added here, such as our highlight.js CSS import at the top, and our highlight.js JavaScript import in the bottom footer. We’ll also add a render call to our navbar. Additionally, make sure to keep the header and footer in the body tag and use sections instead of placing them outside of the body. Then we’ll need to make our navbar. For this, we’ll visit GetBootstrap.com’s navbar section, and then make some tweaks.
<!DOCTYPE html>
<html>
  <head>
    <title>SnippetsBlog</title>
    <%= csrf_meta_tags %>
    <%= csp_meta_tag %>

    <%= stylesheet_link_tag 'application', media: 'all', 'data-turbolinks-track': 'reload' %>
    <%= javascript_pack_tag 'application', 'data-turbolinks-track': 'reload' %>
  <%= stylesheet_pack_tag 'application', media: 'all', 'data-turbolinks-track': 'reload' %>
    <link rel="stylesheet"
      href="//cdnjs.cloudflare.com/ajax/libs/highlight.js/10.4.0/styles/default.min.css">
</head>

  <body>
    <header>
      <%= render 'layouts/navbar' %>
    </header>
    <main>
      <%= yield %>
    </main>
    <footer>
      <script src="//cdnjs.cloudflare.com/ajax/libs/highlight.js/10.4.0/highlight.min.js"></script>
      <script>hljs.initHighlightingOnLoad();</script>
    </footer>
  </body>
</html>
<!-- Inside app/views/layouts/_navbar.html.erb -->
<nav class="navbar navbar-expand-lg navbar-light bg-light">
  <a class="navbar-brand" href="/">Snippets</a>
  <button class="navbar-toggler" type="button" data-toggle="collapse" data-target="#navbarSupportedContent" aria-controls="navbarSupportedContent" aria-expanded="false" aria-label="Toggle navigation">
    <span class="navbar-toggler-icon"></span>
  </button>

  <div class="collapse navbar-collapse" id="navbarSupportedContent">
    <ul class="navbar-nav mr-auto">
      <li class="nav-item active">
        <a class="nav-link" href="#">Home <span class="sr-only">(current)</span></a>
      </li>
      <li class="nav-item">
        <a class="nav-link" href="#">Link</a>
      </li>
      <li class="nav-item dropdown">
        <a class="nav-link dropdown-toggle" href="#" id="navbarDropdown" role="button" data-toggle="dropdown" aria-haspopup="true" aria-expanded="false">
          Languages
        </a>
        <div class="dropdown-menu" aria-labelledby="navbarDropdown">
        <% @languages.each do |lang| %>
          <%= link_to lang.name, snippets_path(lang: lang.name), class:"dropdown-item" %>
        <% end %>
      </li>
      <li class="nav-item">
        <a class="nav-link disabled" href="#">Disabled</a>
      </li>
    </ul>
    <form class="form-inline my-2 my-lg-0">
      <input class="form-control mr-sm-2" type="search" placeholder="Search" aria-label="Search">
      <button class="btn btn-outline-success my-2 my-sm-0" type="submit">Search</button>
    </form>
  </div>
</nav>
Index And Show Pages
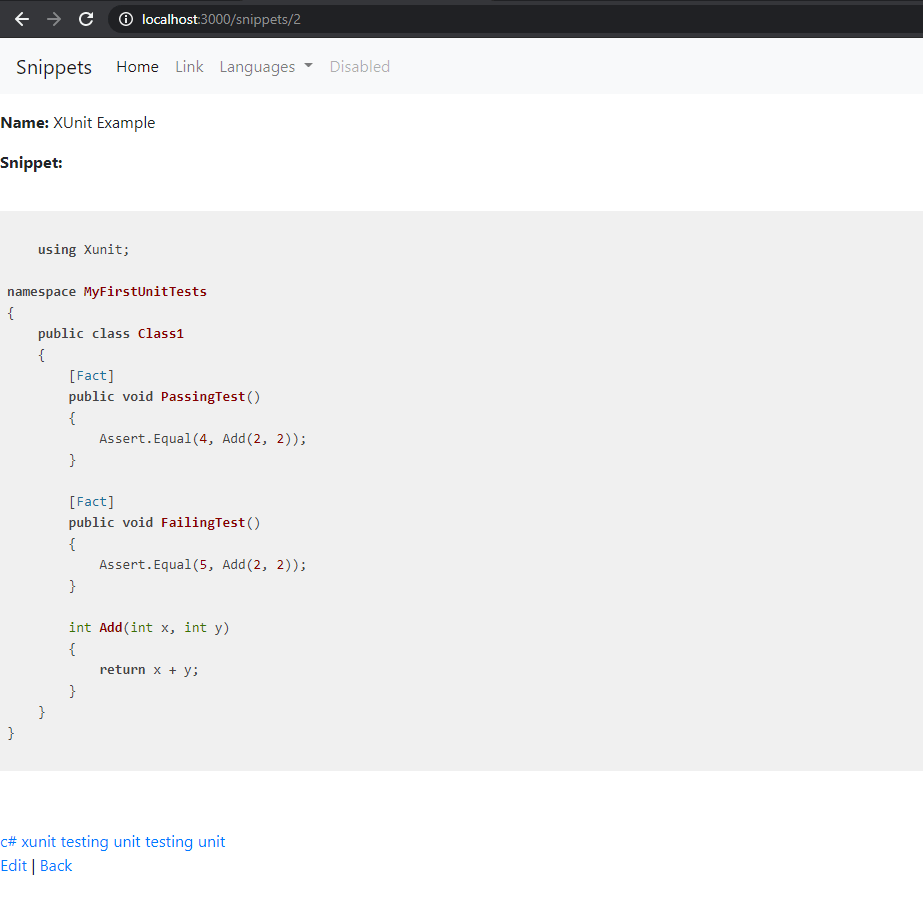
Finally, we’ll edit the index and show page. For the show page, we’re going to use the snippet’s language name to give highlight.js the CSS class name to properly highlight the language. We’ll also list each tag, and pass a link to the snippets page with a tag name. This allows our controller to filter by tags on click. In theory, you could also do this for the language, so consider this an exercise for the reader.
<!-- Inside app/views/snmippets/show.html.erb -->
<p id="notice"><%= notice %></p>

<p>
  <strong>Title:</strong>
  <%= @snippet.title %>
</p>

<p>
  <strong>Code:</strong>
  <pre>
  <code class="<%= @snippet.language.name %> hljs%">
    <%= raw @snippet.body %>
  </code>
  </pre>
</p>

<td>
  <% @snippet.tags.each do |tag| %>
    <%= link_to tag.name, snippets_path(tag: tag.name) %>
  <% end %>
</td>

<%= link_to 'Edit', edit_snippet_path(@snippet) %> |
<%= link_to 'Back', snippets_path %>
<!-- Inside app/views/snippets/index.html.erb -->
<p id="notice"><%= notice %></p>

<h1>Snippets</h1>
<table class="table">
  <thead class="thead-dark">
    <tr>
      <th scope="col">#</th>
      <th scope="col">Name</th>
      <th scope="col">Snippet</th>
      <th scope="col">Tags</th>
      <th scope="col" colspan="3">Manage</th>
    </tr>
  </thead>
  <tbody>
    <% @snippets.each do |snippet| %>
    <tr>
      <th scope="row"><%= snippet.id %></th>
      <td><%= link_to snippet.title, snippet %></td>
        <td><%= snippet.body %></td>
        <td><% snippet.tags.each do |tag|%>
          <%= link_to tag.name, snippets_path(tag: tag.name)%>
        <% end %></td>
        <td><%= link_to 'Show', snippet %></td>
        <td><%= link_to 'Edit', edit_snippet_path(snippet) %></td>
        <td><%= link_to 'Destroy', snippet, method: :delete, data: { confirm: 'Are you sure?' } %></td>
    </tr>
    <% end %>
  </tbody>
</table>

<%= link_to 'New Snippet', new_snippet_path %>
Part 4 - Removing Turbolinks
Finally, we just have one step left. Turbolinks is a tool used to speed up pages by caching some JavaScript. If you’re unaware of Turbolinks, it’s been doing its job. Usually, however, you’ll run into it and that’s when you know you’re in for a rough ride.
Two options exist for dealing with Turbolinks issues such as these. You may either remove Turbolinks entirely from the application or simply add a data-turbolinks=”false” attribute to the tag. Due to this tutorial’s purpose being simply to illustrate the topics covered, we’ll remove Turbolinks. It’s ultimately up to you if you want to remove it from any links to the show page.
To remove Turbolinks, all you need to do is comment it out in the app/javascript/packs/application.js file. Afterward, Turbolinks should allow Highlight.js to load when you visit a page, without needing to refresh first. Without the Turbolinks change, a refresh was required on link traversals. This small change should finish the application!
// This file is automatically compiled by Webpack, along with any other files
// present in this directory. You're encouraged to place your actual application logic in
// a relevant structure within app/javascript and only use these pack files to reference
// that code so it'll be compiled.

require("@rails/ujs").start()
// require("turbolinks").start()
require("@rails/activestorage").start()
require("channels")


// Uncomment to copy all static images under ../images to the output folder and reference
// them with the image_pack_tag helper in views (e.g <%= image_pack_tag 'rails.png' %>)
// or the `imagePath` JavaScript helper below.
//
// const images = require.context('../images', true)
// const imagePath = (name) => images(name, true)
import 'bootstrap/dist/js/bootstrap'
import 'bootstrap/dist/css/bootstrap'
Conclusion
Assuming all of the steps were followed, and nothing has fundamentally changed since publishing this post, your application should work now! Techniques such as these, save for some domain-specific tweaking, should be applicable for a variety of use cases. Please try to remember that programming is not about finding the solution to your entire set of problems.
Software development is about learning how to solve small problems in flexible yet optimal ways. Known solutions may then be used as the building blocks for larger, more polished applications in the future. I hope that this post has provided you with at least one of these building blocks. If you have any questions, feel free to leave a comment down below. I’ll try to get back to you as soon as possible.